I read that you establish more credibility if you use your real name and an actual photo on sites such as Twitter. According to Sebastien Page http://www.sebastienpage.com/2009/01/21/use-your-real-name-on-twitter/ , Scott Williams http://www.twitip.com/10-reasons-to-use-your-real-name-as-your-twitter-name/ , and Carissa Rogers http://goodandcrazypeople.blogspot.com/2009/06/why-should-i-use-my-real-name-on.html , your "personal branding" creates a more professional and approachable look, especially when you are using Twitter for business (and educational) purposes.
So, being a newbie to social networks, I was hesitant to use an actual photo for security reasons. Yet I didn't want to use an avatar or worse, the default logo for the lack of a photo. I decided to look for a more artistic way to display my photograph and stumbled across some fun free photo editing sites.
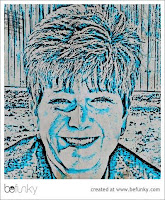
First I started playing around with BeFunky http://www.befunky.com which requires no registration and your creations can be saved and shared. On some options, such as the Patriotic selection, I was unable to view or access the necessary buttons to save my creations. I have submitted the problem but it has not changed for me yet. This is a very easy and fun site to use to alter your digital photographs. Additionally, you can have your creation printed onto a t-shirt or coffee mug or other item for gift purposes!!
I used a sketch option with blue coloring for my Twitter account.
I used the same photo but went with the Warholizer option (no other color options available) for my Facebook account.
Finally I used the same photo again but used the Sunburst effect for my blog page. This option has the least amount of photo enhancement as I wanted to look like a real person for this blog.
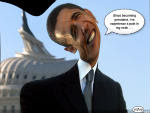
Another site I discovered was piZap http://www.pizap.com/ which was created as a photo tool primarily for social networking users to post images to their favorite social networking sites or to embed their photo into websites. It features cartoon balloons, stickers, and photo editing options. Be sure to check out the "Effects" option as it includes the "twirl" effect (as shown in the Obama photo) as well as color options, a blur effect, and others. The altered photos can be downloaded as well as quick posted to many social networks. It is fun, and easy, and most importantly, it is free!
 a photo tool primarily for social networking users to post images to their favorite social networking sites or to embed their photo into websites. It features cartoon balloons, stickers, and photo editing options. Be sure to check out the "Effects" option as it includes the "twirl" effect (as shown in the Obama photo) as well as color options, a blur effect, and others. The altered photos can be downloaded as well as quick posted to many social networks. It is fun, and easy, and most importantly, it is free!
 x
Now I also wanted to release my more artistic side so I tried a site called Psykopaint http://www.psykopaint.com however I quickly discovered that I'm really not that talented. I would say this site is truly for painting artists that enjoy dabbling with digital photos. I had difficulty controlling the brush and I really didn't know the difference of some of the terminology. It is in Beta form but it is one to watch for upcoming advancements if you know how to paint.
x
The last site I want to share for now is a free site called Block Posters http://www.blockposters.com where you can enlarge photos to poster size. The site suggests that teachers could enlarge particular photos to use on bulletin boards for educational and decorative purposes. The selected photo is printed on several separate pages that you determine for the size you want and then piece together to create the larger final product. Although it appears that the final enlarged product may have a more pixelated finish, for certain situations, this could look quite artistic.
Let me assure you that all of these sites (other than Psykopaint) are very easy to use and are a lot of fun! Consider using them to create special photos for social network pages or for scrapbooks or for whatever makes you happy!


Thanks, it looks really cool and I like Pizap. Yesterday I found one more site where we can edit our pictures: Picjoke.com - funny photos it has more than 100 funny photo templates. It is free and very easy to use
ReplyDelete